  |
|
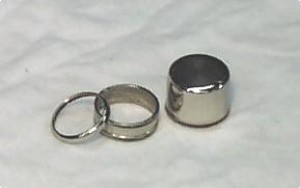
This guide is intended to assist rod craftsmen in converting the supplied nickle silver cup blanks into finished butt cap, slide band and grip check for slide band (cap and ring) style reel seats. As such, they presume that the craftsman has personal skills in machine tool operation and safety.
Always wear safety glasses when operating power equipment.
|
|
Insert
Before machining the hardware, fabricate an insert either to your preferences or to the guidelines enclosed. Measure the inside diameter of the cups and use this dimension to establish the outside diameter of your insert. Allow no more than about .005 to .010 inches for adhesive between the inside of the cup and the outside diameter of the insert. Once the insert is made you may use it as a reference to establish the dimensions for the grip check.
|
Grip Check
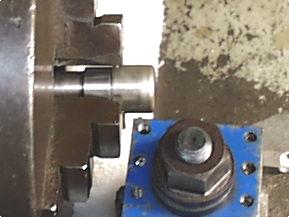
In order to prevent the chuck jaws from crushing the cup while you are turning it, a filler piece turned to be just a few thousands of an inch smaller than the inside diameter of the cup is required. Insert this filler into the cup permitting a bit of space to remain between the bottom of the cup and the filler piece. Insert the whole into your chuck, check for minimal runout and tighten. Center drill, drill and bore to suit your previously made reel seat insert. (See the insert drawing provided.) Deburr and polish the protruding cup blank. Part off to .078 wide. Buff to a high sheen.
 | |
|
Butt Cap Tools
Before finishing the butt cap you will have to make a couple of simple tools. Ths first is a turning mandrill. This tool will be used to hold and turn the but cap blank in the lathe. Make this tool with a radius or chamfer sufficient to permit it to reach onto the bottom of the cup. Sufficient space between the chuck jaws and the located cup should be allowed to permit the approach of your cut off and knurling tools. The second is a pressure pad. Make this from material not likely to mark or indent your cup such as delrin, nylon or even PVC.
 | |
|
Pressure Pad
Chuck an appropriate piece of plastic. Turn to a diameter less than that of the cup blank, about .030 smaller than the cup O.D. or so and long enough to permit your lathe tools to clear the tail stock and center when this tool is in use. Face and center drill, part off and de-burr.
|
Butt Cap
Chuck your previously made turning mandrill and slide a cup onto it. Place the pressure pad against the bottom of the cup and hold it in location. Insert your ball bearing tailstock center into the tailstock and slide it over to the pressure pad picking up the previously drilled center hole. Secure the tailstock and apply modest force against the cup/pressure pad with the tailstock screw. Check the cup blank/mandrill for minimal runout. Adjust runout to be less than .005 inch. When adjusted and secure, turn the cup blank removing no more than .005 inch to clean up the exterior. Switch to your parting off tool and establish the top or height of the butt cap to conform to your design or to the drawing provided. Doing so will require the tool to penetrate slightly into the turning mandrill.
Polish your work starting with medium fine sand paper strips working up to fine grits and then to steel wool. Knurl to suit if desired. Remove the pressure pad and carefully polish the entire cap avoiding the knurling. Remove from the lathe and buff to a high sheen.

 | |
|
Slide Band
Your ring or slide band will be made from the remaining cap. Set up as if for a butt cap. Establish the left edge of the ring in the same way that you did for the height of the butt cap. Contour the ring surface if desired and polish. Knurl if desired. Part off to the desired width. A lathe carriage stop with dial indicator will make turning, knurling and cutting off the ring more precise. Remove the ring and remaining cup part carefully. Gripping the turned pieces with a portion of rubber inner tube helps.
It may be desireable to form a slight conical taper on the inside of the slide band to facilitate its gripping of reel feet. This may be done using the tapered portion of a #2 Morse Taper shank tool. A hole equal to the inside diameter of your cups drilled into a block of steel will assist in driving the finished ring onto the taper shank. Use care to taper the ring just slightly as too much stretch will cause the ring to split.
 | |
|
Polishing and Buffing.
After machining your checks, cups and rings; you may want to polish and buff your parts in order to improve the finish. Before removing them from the lathe, you may polish the part with strips of fine grit sand paper working from 320 grit to 600 grit. After sand paper polishing you may also continue with first medium and then finer grades of steel wool. This process will provide an adequate finish for many. Keep in mind that polishing knurled parts will injur the knurling. Knurled parts should be buffed, not sand paper polished. Better still, polish those parts you wish to knurl prior to knurling. Then knurl in the normal way. If a higher luster is desired, you may buff your parts. Buffing may be done with linen or cotton buffing wheels mounted on high speed horizontal arbors. A buffing compound is applied to the rotating wheel and the part lightly applied to the rotating wheel. Follow wheel and compound manufacturers directions for best results.
Disclaimer: The successful conversion of purchased nickle silver cups into visually and technically acceptable rod/reel seat components requires personal technical skill in machine operation, knowledge of strength of material issues and of general manufacturing technology. The supplier makes no guarantee that any individual can successfully do so and is specifically not responsible for any injury or damage that may come about as a result of machining or finishing or attempting to machine or finish purchased cups. Machining metal is inherently dangerous.
|
This document and additional information including drawings of the parts noted above are available on the web. Go to https://brooksiderod.tripod.com/components.htm and click on the desired hyperlink located in the left hand column.
|
|
|
|